The Complete 2026 Guide to Piercing: Types, Pain, Healing & Aftercare
Discover The Complete Guide to Piercing covering types of piercings, pain levels, healing times, aftercare, risks, jewelry tips, styling ideas and expert answers to common questions.
Piercings have moved from quiet little studs in the ears to full blown personal branding. One person’s subtle gold lobe stud is another person’s curated ear stack, nose ring, eyebrow bar and sparkling navel charm. Piercing is no longer just a small accessory choice. It is a lifestyle statement and, for many, an everyday part of their jewelry wardrobe.
If you are thinking about getting pierced or expanding your collection, you probably have a dozen questions. How much will it hurt? What should you get first? Is it safe? How long does it take to heal? What kind of jewelry should you choose so your skin does not freak out?
This hub is exactly what it sounds like: The Complete Guide to Piercing. We will walk through types of piercings, pain and healing, safe aftercare, studio and jewelry choices, styling ideas, and those niggling worries people are shy to ask out loud. Along the way, you will also spot natural ways to connect piercings with your overall jewelry look, from delicate studs to bold statement hoops and huggies.
The Complete Guide to Piercing at a Glance
This guide covers everything from types of piercings and pain levels to aftercare steps and jewelry choices to help you make safe and stylish decisions.
Before we dive deep, here is a quick snapshot of what this guide covers. Think of it as your road map.
- Process: What piercing really is and how the needle process works to create a safe channel.
- Types: The most popular ear, facial, body and oral piercings and what they are technically called.
- Safety: How to choose a safe, reputable studio and a professional piercer who puts hygiene first.
- Materials: Which jewelry materials are skin friendly and long lasting versus those that cause reactions.
- Pain & Healing: Pain levels and realistic healing timelines for common placements like lobes and cartilage.
- Aftercare: Daily cleaning routines that actually help you heal instead of irritating the sensitive area.
- Risks: Common problems like infection or keloids and red flags to watch for during the healing phase.
- Styling: How to style your piercings to complement your other jewelry rather than compete with it.
Keep this mental checklist handy as you read. By the time you reach the end, The Complete Guide to Piercing will feel less like an intimidating medical decision and more like a well planned style upgrade.
You can also explore our complete and comprehensive Guide to Ear Piercing.
You can also explore our complete and comprehensive Guide to Nose Piercing.
What Actually Happens During a Piercing?
A professional piercer cleans the skin, marks the exact spot and uses a sterile needle to create a hole before inserting jewelry.
At its simplest, a piercing is a controlled puncture through a small area of skin using a sterile single use needle or specialized device. This is followed by the insertion of jewelry that holds the channel open while your body heals around it.
A professional piercer will usually follow these steps:
- Consultation: They talk with you about placement, your anatomy and jewelry options to ensure the piercing will sit correctly.
- Prep: They clean and mark the area with a pen so you can look in a mirror and confirm the exact spot you want.
- Procedure: They use sterile tools and a sharp needle to create the opening quickly and cleanly.
- Jewelry Insertion: They insert pre-sterilized jewelry made from skin safe material immediately after the needle passes through.
- Aftercare: They explain cleaning rules and healing time, and they may schedule or suggest check ins to monitor progress.
Although it is a minor procedure, your body treats it like any other wound. That means there is inflammation, healing tissue and a gradual shift from a raw opening to a stable channel. This channel can eventually hold different jewelry safely. The quality of the technique, the hygiene of the environment and how carefully you follow aftercare can make or break your experience.
Popular Types of Piercings
The most common piercings are found on the ears, nose, face and body, each with specific names like helix, septum or navel.
Body piercing has exploded into a whole universe of placements and names, especially around the ears and face. Think of your body as a canvas and your jewelry as the tiny artworks that live on it. Here are the basics regarding the most popular options.
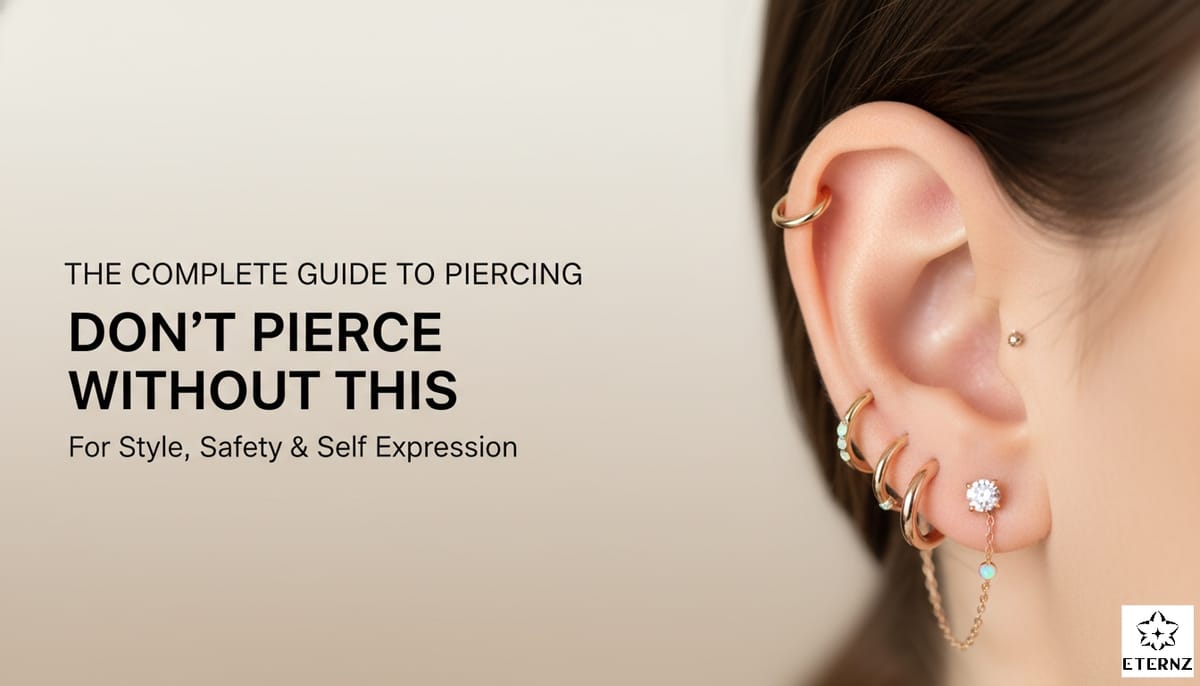
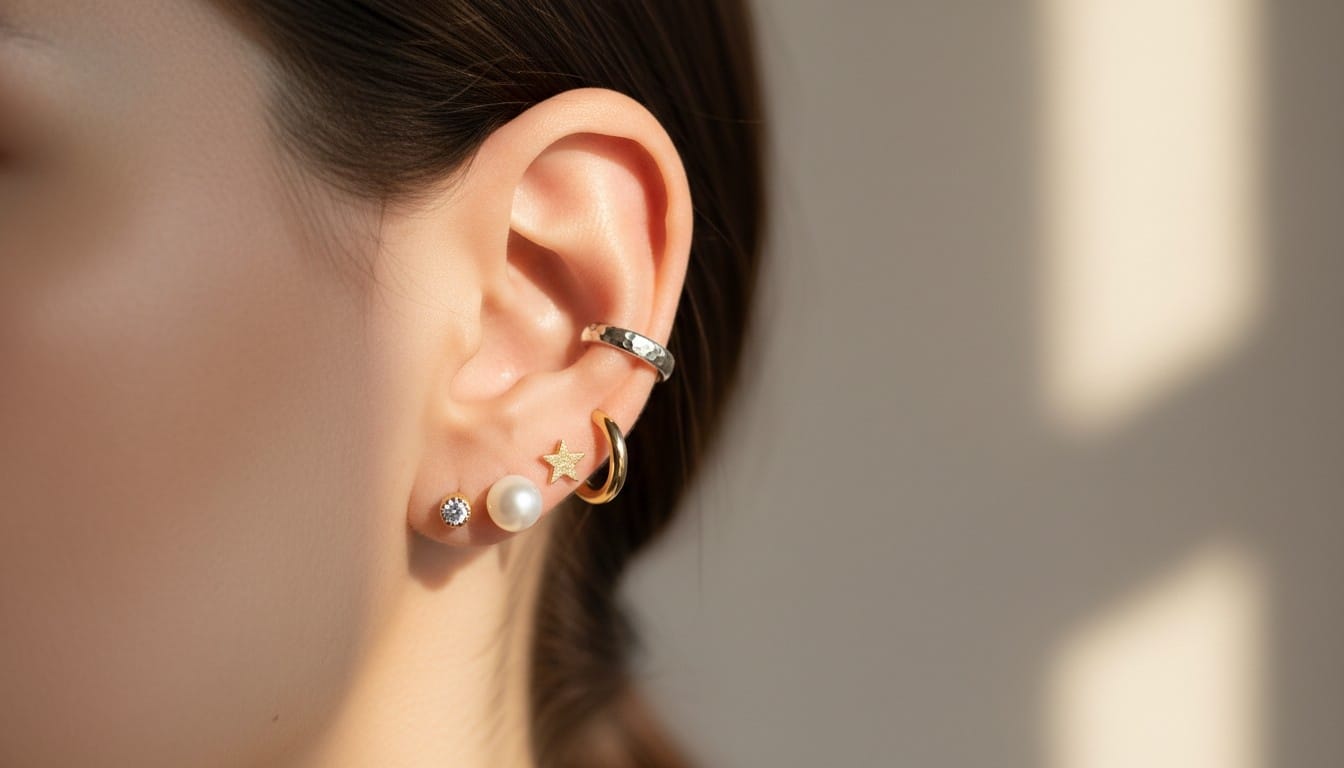
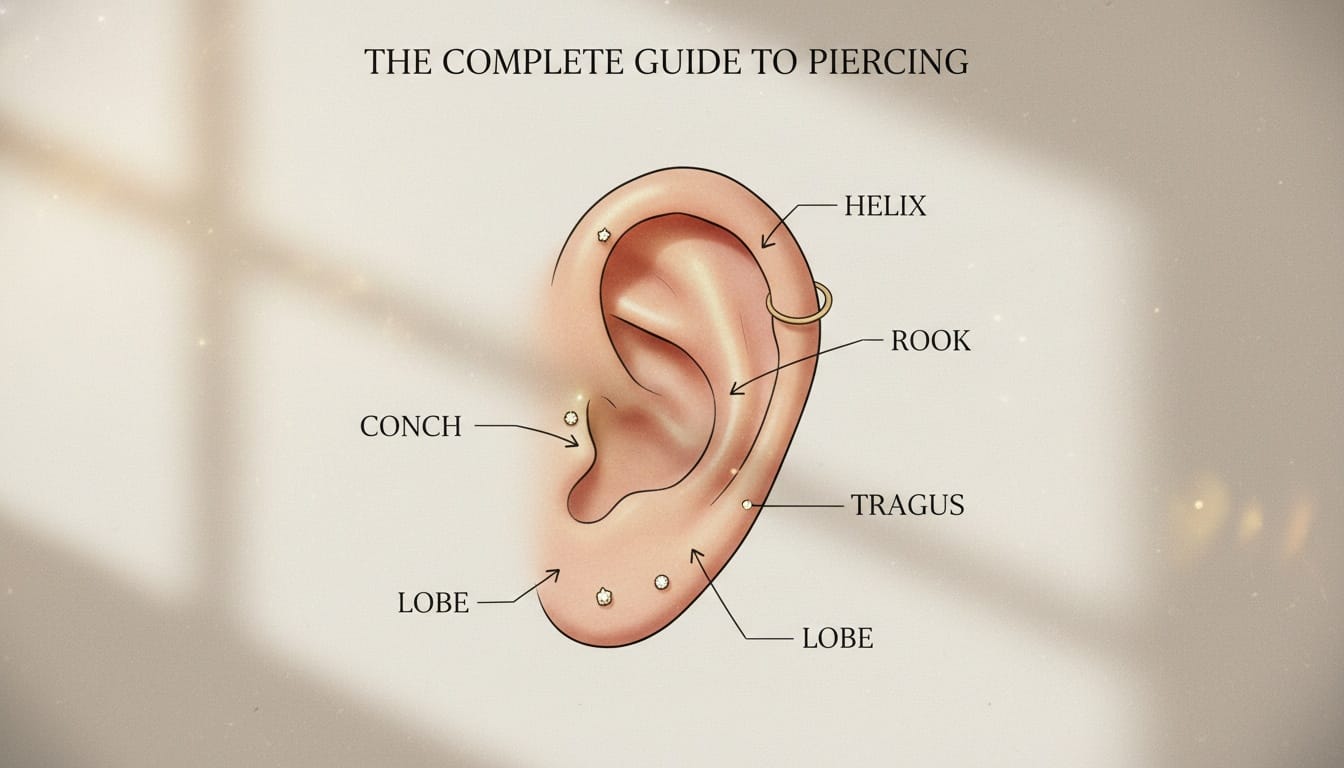
Ear Piercings
Ear piercings range from soft lobe placements to cartilage areas like the helix, tragus and conch.
Ears are still the most common place to start, and there is far more than the classic single lobe. The ear is divided into the soft lobe at the bottom and the harder cartilage at the top.
- Lobe: The soft lower part of the ear. It is generally the quickest to heal and least painful option.
- High or stacked lobe: Multiple piercings climbing up the soft tissue of the lobe. This is ideal for curated stacks of small studs and hoops and huggies. For inspiration on how to style them, check out our guide on ear stacking.
- Helix and forward helix: These are located around the outer top rim of the ear and the front section near your face. It is a cartilage area that looks great with hoops and minimalist bars but takes longer to heal.
- Tragus and anti tragus: The small flap at the entrance to the ear canal and the bump opposite it. These are trendy and subtle placements that can be more sensitive because of thicker cartilage.
- Conch, rook, daith and industrial: These cover the inner bowl of the ear, inner ridges or a bar passing through two points. These are prime real estate for statement pieces and chains but often sit on the higher end of the pain and healing scale.
With ears, jewelry is half the fun. From diamond studs to sculptural cuffs and tiny hoops, you can build a whole jewelry story on one ear, let alone two.
Nose Piercings
Nose piercings include the nostril on the side and the septum in the middle.
Nose piercings are some of the most visible facial piercings and instantly change your vibe. They act as a center point for the face.
- Nostril: This is the classic small nose pin or ring at the side of the nose. It is one of the most popular piercings globally.
- Septum: This goes through the soft tissue between the nostrils. It is usually worn with circular barbells or clickers.
- Bridge and high nostril: These sit between the eyes or higher on the nose. They are more advanced placements with a bolder look.
In South Asian cultures, nostril piercings are deeply tied to tradition and bridal jewelry. This ranges from delicate chains to ornate nose pins (nath) that match necklaces and earrings.
Lip and Facial Piercings
Facial piercings include eyebrows, lips and cheeks to frame your features.
Facial piercings frame your features the way statement earrings frame a face shape. They draw attention to the eyes or mouth.
- Eyebrow: Vertical or horizontal bars that sit through the eyebrow ridge.
- Upper Lip: Styles like the Monroe or Medusa sit above the top lip and look like beauty marks.
- Lower Lip: Variations like the labret and snake bites sit below the bottom lip.
- Cheek: Also known as dimple piercings, these sit on the cheeks to mimic dimples.
Each has its own position and style traditions, from barely there micro studs to noticeable spikes or rings.
Oral and Tongue Piercings
These piercings are inside the mouth or on the tongue and heal quickly but need careful cleaning.
Tongue and oral piercings are among the most discreet when your mouth is closed. However, they come with some specific risk considerations. Jewelry here can bump against teeth and gums. Swelling right after the procedure needs careful monitoring to ensure it does not block airways or cause discomfort.
If you choose an oral piercing, high quality jewelry and strict hygiene are non negotiable. You will be extra aware of texture when you talk and eat for a while.
Navel and Body Piercings
Body piercings like the navel or dermal anchors are placed on the torso for style.
Navel piercings had a huge moment in pop culture and still remain popular for people who love crop tops, saree drapes that reveal the waist, swimwear and festival looks.
Other body piercings include nipple piercings and various surface or dermal piercings on the chest, hips, neck and more. These can become beautiful focal points for body chains, layered waist belts and beach friendly accessories. This works well as long as clothing friction and healing are managed well.
How Much Do Piercings Hurt?
Pain is usually a quick pinch or pressure that ranges from low for earlobes to higher for thick cartilage.
Here is the honest answer: Pain is real but brief. It varies depending on placement, your pain tolerance and how skilled your piercer is. Soft tissue like the earlobe is usually rated around two or three on a ten point pain scale. Thicker cartilage like rook or daith can feel more like six to eight.
What most people describe is:
- A sharp pinch that lasts a moment.
- A wave of warmth or pressure in the area.
- A throbbing or tender feeling for a few hours or days afterward.
The mental build up is usually worse than the reality. Breathing steadily helps calm the nervous system. Having a trusted friend along and choosing a calm professional studio environment all help reduce anxiety. Some people even treat new piercings as small self empowerment rituals. They use the experience to mark milestones with a new piece of jewelry.
Healing Times and What to Realistically Expect
Healing takes anywhere from six weeks for lobes to over a year for complex cartilage piercings.
Healing is where many beginners underestimate the commitment. Even if a piercing looks fine from the outside, the inner tissue can still be repairing itself for months.
Estimated Healing Times
| Piercing Type | Healing Time | Notes |
|---|---|---|
| Earlobe | 6 to 8 weeks | Fastest to heal. |
| Cartilage (Helix/Tragus) | 6 to 12 months | Prone to bumps if slept on. |
| Nostril | 4 to 6 months | Be careful with face towels. |
| Septum | 2 to 3 months | Heals relatively fast. |
| Navel | 6 to 12 months | Irritated by waistbands. |
| Tongue | 4 to 8 weeks | Fast healing due to blood flow. |
A piercing may look calm and feel fine in a couple of weeks, but the channel is still fragile. Removing jewelry too early or constantly changing it for new styles can irritate or tear the tissue. Patience really is a virtue here.
The Complete Guide to Piercing Aftercare
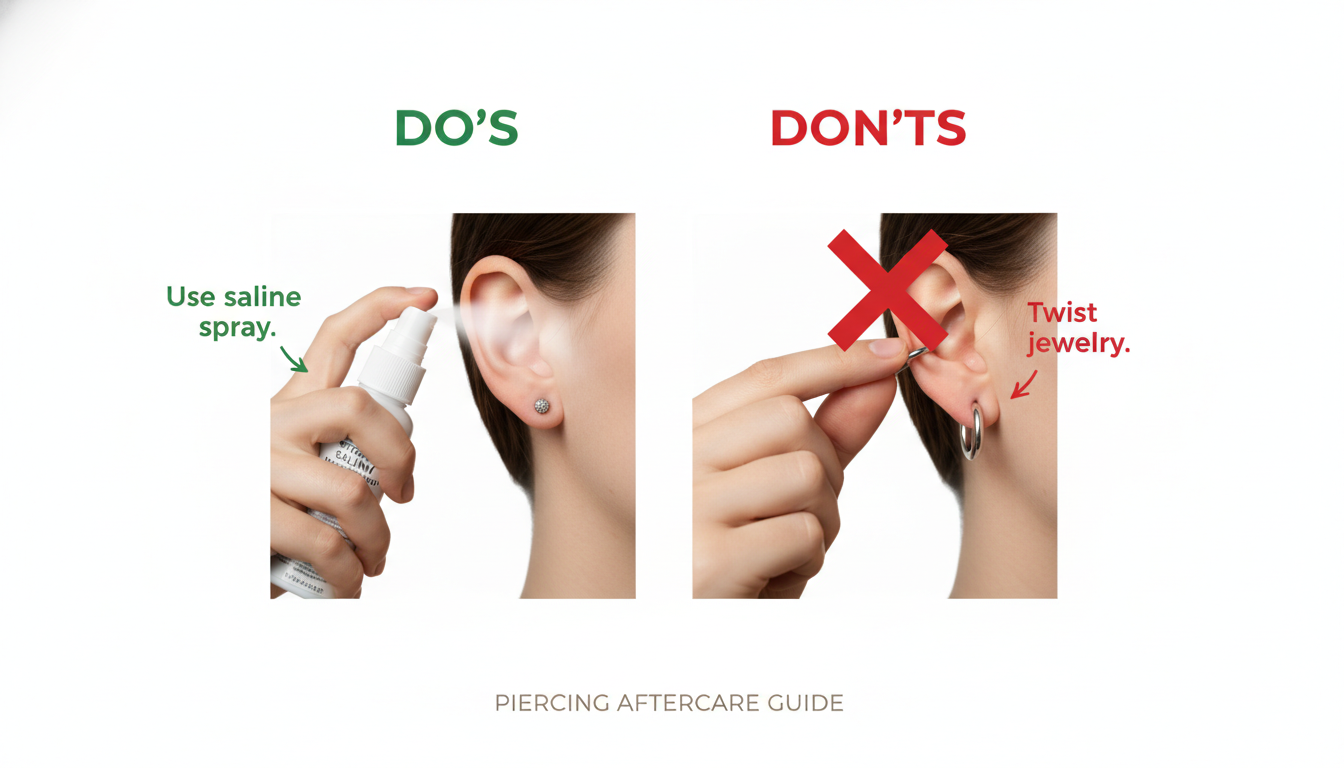
Clean your piercing twice a day with sterile saline and avoid touching it to prevent infection.
Aftercare is where people either set themselves up for a smooth experience or end up chasing unnecessary irritation. The general rule of thumb from professional organizations and studios is simple: gentle, consistent care.
What Should You Do to Care for a New Piercing?
Most reputable studios now recommend a routine like this.
- Wash Hands: Always wash your hands thoroughly before touching your piercing or jewelry.
- Saline Cleanse: Clean with sterile saline labeled for wound care once or twice daily. You can spray it directly or soak a clean piece of gauze and gently apply it.
- Rinse: Rinse away residue with clean water in the shower if needed rather than letting salt dry on the skin.
- Dry Gently: Dry the area gently with disposable paper or gauze instead of fabric towels. Fabric towels can harbor bacteria and snag jewelry.
- Leave It Alone: No twisting, spinning or playing with the jewelry. This only disrupts healing tissue and introduces bacteria.
For oral piercings, studios often add salt water or alcohol free mouth rinses after meals to keep the area clean without harsh ingredients.
What Should You Avoid During Healing?
Here is where people often go wrong even with the best intentions.
- No Alcohol: Avoid alcohol or hydrogen peroxide on the piercing. These are too harsh and can damage new cells.
- No DIY Mixes: Avoid DIY sea salt mixes unless a professional specifically guides you. It is very easy to make them too strong and dry out your skin.
- No Ointments: Avoid thick ointments that block airflow. The wound needs to breathe to heal.
- No Pressure: Avoid sleeping directly on fresh cartilage piercings. Try piercing pillows or travel pillows to keep the ear off the mattress.
- No Swimming: Avoid swimming in pools, lakes or hot tubs until things are well healed. These environments can harbor bacteria.
- No Early Changes: Avoid switching jewelry early just for style. Wait until your piercer confirms that the channel is stable enough.
Good aftercare is not glamorous. It is the quiet behind the scenes work that lets you enjoy those tiny pieces of jewelry long term.
Choosing a Safe Piercing Studio
Look for a studio that uses single use needles, has an autoclave and keeps a clean environment.
A stylish Instagram feed is nice, but when someone is putting a needle through your body, safety comes first. Health organizations and professional associations emphasize that poor hygiene and technique raise the risk of local and sometimes systemic infections.
When you walk into a studio, look and ask for:
- Gloves: The piercer should use disposable gloves and put on fresh ones for each client.
- Sterile Tools: Needles and jewelry should be individually packaged and sterilized. They should be opened in front of you.
- Clean Space: The room should be well lit with surfaces that can be disinfected easily.
- Autoclave: Ask if they have autoclave sterilization records for their tools.
- Documentation: They should provide clear consent forms and written aftercare instructions.
- Communication: A good piercer is willing to discuss anatomy, placement and jewelry choices. They should not rush you through the process.
If anything feels off, your gut matters. There are plenty of brilliant studios who treat piercing as both art and healthcare procedure. You deserve that standard.
Jewelry Materials and Styles That Treat Your Skin Kindly
Implant grade titanium and 14k gold are the safest metals for fresh piercings to avoid allergic reactions.
Here is where your love for jewelry really comes into play. The metal you choose can influence how your piercing heals and how your skin reacts.
Professionals commonly recommend:
- Implant Grade Titanium: This is the gold standard for first piercings. It is lightweight, nickel free and highly skin friendly.
- Solid Gold: High quality gold at fourteen karat or higher is excellent. It should have minimal nickel content for those who love warm tones. Learn more about why materials like 925 sterling silver are perfect for everyday luxury, even for sensitive skin once the piercing is fully healed.
- Niobium: This is similar to titanium and is often used for its hypoallergenic properties.
- Surgical Steel: High quality surgical steel can work for some, but it often contains nickel. Be careful if you have sensitive skin.
On top of the metal, you can play with styles that tie your piercing journey back into your overall jewelry game. Think:
- Matching Sets: Tiny solitaire studs that echo your engagement ring or pendant.
- Daily Wear: Minimalist hoops and huggies that match your favorite daily bangles.
- Chains: Delicate chains connecting two piercings to mirror layered necklaces.
- Gemstones: Gemstone pieces that coordinate with your birthstone jewelry or festive outfits. To help define your aesthetic, browse our guide on how to find your perfect match: a guide to popular jewellery styles.
Over time, The Complete Guide to Piercing becomes not just a list of placements but a personal collection of mini jewels that tell your story. You can explore our full range of body safe options in our shop by category.
Check out Eternz for your accessory needs. They are the ultimate destination for upgrading your collection. You can find over 300 trusted brands all in one place.
Common Piercing Risks and How to Spot Trouble
Watch for excessive swelling, hot skin, yellow pus or bumps which may signal infection or rejection.
Even with great studios and careful aftercare, there are real risks. Most are manageable if you catch them early and consult a professional piercer or healthcare provider when needed.
How Do You Know If a Piercing Is Infected?
Mild redness and tenderness are normal at first. Infections usually show different signs.
- Worsening Symptoms: Increasing redness and swelling after the first few days instead of gradual improvement.
- Heat: The area feels hot to the touch or throbs with pain.
- Discharge: Thick yellow or green pus appears. This may have a foul smell.
- Illness: Fever or feeling unwell in more serious cases.
These problems often arise from touching the area with unwashed hands, not cleaning the area properly or being pierced with poorly sterilized tools.
What About Keloids and Scarring?
Keloids are raised scars that grow beyond the original border of the wound. They are more likely to occur in some individuals and at certain sites like the upper ear cartilage. They can start as firm, itchy bumps that gradually expand.
Dermatologists may treat them with steroid injections, pressure therapy, freezing or in some cases surgery. If you know you are prone to keloids, it is worth discussing risk with both your piercer and a skin specialist before choosing new placements.
Other Possible Complications
Depending on location and habit, complications can also include:
- Trauma: Torn lobes from heavy earrings or getting jewelry caught on clothing.
- Dental Issues: Cracked teeth or damaged gums from oral jewelry that hits them repeatedly.
- Migration: Rejection of surface piercings that slowly get pushed toward the skin surface.
None of this is meant to scare you away but to keep you informed. A little healthy respect for what can go wrong helps you avoid shortcuts and choose wisely.
Styling Your Piercings With Jewelry and Outfits
Balance your look by mixing studs, hoops and chains to match your personal style and wardrobe.
Once you are healed, this is the fun reward. Piercings let you layer jewelry in three dimensions, not just at the neck or wrist.
Consider styling ideas like:
- Graduated Stack: Build a graduated ear stack from simple lobe studs to tiny hoops and a single statement conch piece. For a deep dive, revisit our ear stacking guide.
- Cohesive Face: Pair a nose pin with a subtle chain necklace and matching metal bangles for a cohesive everyday look.
- Body Sparkle: Combine a navel piercing charm with waist belts or saree drapes that reveal just a hint of sparkle.
- Mixed Match: Use mismatched but coordinated studs across multiple piercings to echo colors in your rings or bracelets.
The magic is in balance. Let one or two pieces do the talking while the rest whisper. That way your overall jewelry styling feels intentional instead of crowded.
The Complete Guide to Piercing for Different Lifestyles
Your job, sports activities and sleep habits should influence where and when you get pierced.
Your ideal piercing setup depends not just on aesthetics but on your job, hobbies and long term plans.
- Students and Creatives: You often have plenty of freedom to experiment with visible piercings, bold jewelry and multiple placements.
- Corporate Roles: You may prefer placements that can be toned down with tiny studs or even hidden. Helix, rook or curated lobe stacks with delicate pieces work well here.
- Active Lifestyles: You need to think about how helmets, headphones, sports bras or waistbands will interact with fresh piercings. Sweat and friction can irritate healing wounds.
If you foresee big life events such as weddings, career changes or moves into more formal environments, it might be smart to time new piercings so they are well healed when you need flexibility.
Frequently Asked Questions About First Piercings (FAQs)
Common questions cover pain, healing time, bumps and when to change jewelry.
1. What is the best first piercing for beginners?
Earlobe piercings are the most beginner-friendly. The tissue is soft, pain is usually mild, healing is faster than cartilage, and you get versatile jewelry options from simple studs to statement drops.
2. Is a needle safer than a piercing gun?
Yes. Professional piercers prefer single-use sterile needles because they create a cleaner channel, cause less tissue trauma, and are safer — especially for cartilage piercings.
3. What happens during a professional piercing procedure?
A professional piercer will:
- Conduct a consultation
- Clean and mark the area
- Use sterile tools and a sharp needle
- Insert pre-sterilized jewelry
- Provide aftercare instructions
4. How long should I wait before changing my piercing jewelry?
Wait until the initial healing phase is complete and your piercer confirms it is safe. Lobes may take several weeks. Cartilage, navel, or other body piercings can take several months.
5. Can I sleep on a fresh piercing?
It’s best to avoid constant pressure on a new piercing, especially cartilage. Sleeping directly on it can slow healing and cause irritation bumps.
6. What are common types of ear, nose, and body piercings?
- Ear: lobe, helix, tragus, conch
- Nose: nostril, septum
- Body: navel
- Facial: eyebrow, lip
7. What jewelry materials are safest for new piercings?
Implant-grade titanium, surgical stainless steel, and other skin-safe, pre-sterilized materials are best for reducing allergic reactions and supporting proper healing.
8. How can I ensure safe healing after a piercing?
Choose a reputable studio, follow daily cleaning instructions, avoid touching the area unnecessarily, and do not change jewelry too early.